Brett is a web development consultant and has been working for more than 12 years. He specializes in hybrid mobile app development and using front end frameworks such as AngularJS. Always passionate about continuous education, he has been most recently mentoring and encouraging his co-workers to become better speakers. To further this growth, he leads Lightning Talk Nights and other events at his job at HMB Inc
In this episode of #CodingPersonalities, Kelsey and I sit down with Jon Ash to discuss his podcast “The Six Figure Developer” and how he got his start as a developer.
This episode on Coding Personalities Kelsey and I sit down with Joseph Vadala to discuss podcasting. Joseph has a blog and podcast with three friends where they discuss personal finance, personal goals, and self improvement to succeed in life.
We do not receive any compensation for promoting these books or you using these links.
You can contact Joseph at:
Twitter: EscapeTheBoxPod or Joseph Vadala
Blog: EscapeTheBoxPodcast.com
*Kelsey’s and my opinions only represent themselves and not any other organization or their employer.
You can contact us here or on Twitter: Kelsey Robertson Brett Whittington
Welcome to my tutorial on learning the Ionic Framework. During the course of this lab, you’ll hopefully learn a basic understanding of the Ionic Framework and also learn a bit if Angular 5. If you’re already familiar with either one, this lab will probably not be for you.
Lab Five will walk through Ionic Cordova Plugins in a mobile application.
It took me a while to fully grasp these concepts to I hope to share with you want I learned. If you missed Lab four check out Learning the Ionic Framework – Forms.
Welcome to my tutorial on learning the Ionic Framework. During the course of this lab, you’ll hopefully learn a basic understanding of the Ionic Framework and also learn a bit if Angular 5. If you’re already familiar with either one, this lab will probably not be for you. Lab four will walk through forms in a mobile application.
It took me a while to fully grasp these concepts to I hope to share with you want I learned. If you missed Lab Three check out Learning the Ionic Framework – Events.
Getting Started
First things first. I already created the lab four page and set it up so that navigation will work. I think after using ionic generate page 3 times (if you followed my other labs) you have the idea right?
Create a lab-four-start folder on your machine and open it with VS Code
We’ll be building a basic form in Ionic. We’ll be heavily using a lot of features of Angular to accomplish this task but there are really two different ways to build these forms.
Template Driven Forms
Template driven forms are more what developers are used to. To build them you would create HTML controls just like you would in a normal web page and you bind them using directives like NgModel. Another feature of these types of forms is that they are asynchronous which means you can immediately update any one value through all the children of the form. A negative is that due to this updating, you have to wait a tick before you can changing any thing else on the component. Another negative is that it is hard to test these types of forms.
Reactive Forms
Reactive form are quite a bit different from what most developers are used to. One difference is the handling of the data is explicit between the data model and the UI. This offers easier testing of the data if you are so inclined. The component can also push data and pull changes out. The benefit is that the data model is immutable so there are no timing issues that can arise like template driven forms.
Let’s Do This!
We’ll be working with Reactive Forms in this lab because I want to and I think it is good to go over something that most people haven’t done.
So far our solution has a books component and all of it’s stuff is in one folder. If we follow the Angular style guide, we should really be breaking things into separate folders. In past labs, we didn’t need to do this because we only had one component. In this lab, we will be creating two new additional components, so we should do some refactoring.
Create a book-list folder.
Create a book-details folder.
Create a add-book folder.
Create shared folder
Rename books.html to book-list.html and move it to book-list
Rename books.scss to book-list.scss and move it to book-list.
Rename books.ts to book-list.ts and move it to book-list
Run ionic-serve and expect some errors.
Womp Womp!
Let’s do a full search for the following and fix up our imports!
book-list.ts – import { Book } from ‘../shared/book.model’
details.ts – import { Book, fakeBookList } from ‘../../components/books/shared/book.model’;
lab-three.ts –import { Book, fakeBookList } from ‘../../components/books/shared/book.model’;
lab-two.ts – import { Book, fakeBookList } from ‘../../components/books/shared/book.model’;
We also need to fix our book-list.ts reference to the template file.
Now that books is it’s own section, we should create a books module that will wrap all of our books components in one namespace. This will prevent us from having to constantly add all of our components to all the pages we need.
import { NgModule } from '@angular/core';
import { IonicModule } from 'ionic-angular';
import { BooksComponent } from '../books/book-list/book-list';

@NgModule({
    declarations: [BooksComponent],
    imports: [IonicModule],
    exports: [BooksComponent]
})
export class BooksModule {}
Now click through your app in ionic serve every page should be working with the changes we just made!
We also should clean up our details page from lab three. We have functionality there that should really be a component. To accomplish this, we will create this component under book-details. We could use ionic generate to do this, but it would just create a new folder under the components root. In situations like these, I don’t like breaking away from the Angular style guide. So create the following files in book-details:
book-details.html
book-details.scss
book-details.ts
Copy the book-details html code from details.html and paste into book-details. This means everything inside the ion-content tags. Then replace that code with tags for book-details. We also want to send in pass in our book data.
<!--
  Generated template for the DetailsPage page.

  See http://ionicframework.com/docs/components/#navigation for more info on
  Ionic pages and navigation.
-->
<ion-header>

  <ion-navbar>
    <ion-title>Book Details</ion-title>
  </ion-navbar>

</ion-header>


<ion-content padding>
  <book-details [book]='book'></book-details>
</ion-content>
Now, every thing that was working from Lab Three is working again despite us changing component names and creating a new component.
Off to the Forms!
In the add-book folder, add the following new files:
add-book.html
add-book.scss
add-book.ts
In your add-book.html use the following code to setup your template.
<br /><h2>Add Book</h2>
<p>Please add the following information to add a new book to the list.</p>
<ion-list>
    <ion-item>
        <ion-label floating>Book Name</ion-label>
        <ion-input class="form-control" [formControl]="title"></ion-input>
    </ion-item>
    <ion-item>
        <ion-label floating>Book Description</ion-label>
        <ion-input class="form-control" [formControl]="description"></ion-input>
    </ion-item>
    <ion-item>
      <ion-label floating>Cover Image</ion-label>
      <ion-input class="form-control" [formControl]="backgroundImage"></ion-input>
    </ion-item>
</ion-list>
In your add-book.ts use the following code to link your reactive form with your template.
import { Component, Input } from '@angular/core';
import { IonicPage, NavController, NavParams } from 'ionic-angular';
import { Book, fakeBookList } from '../shared/book.model';
import { FormControl, FormGroup } from '@angular/forms';

@Component({
  selector: 'add-book',
  templateUrl: 'add-book.html'
})
export class AddBookComponent {
  title = new FormControl();
  description = new FormControl();
  backgroundImage = new FormControl();

  constructor() {

  }

  ionViewDidLoad() {
    console.log('ionViewDidLoad DetailsPage');
  }

}
import { Component, Input } from '@angular/core';
import { IonicPage, NavController, NavParams } from 'ionic-angular';
import { Book, fakeBookList } from '../shared/book.model';
import { FormControl, FormGroup } from '@angular/forms';

@Component({
  selector: 'add-book',
  templateUrl: 'add-book.html'
})
export class AddBookComponent {
  addBookForm = new FormGroup ({
  title : new FormControl(),
  description : new FormControl(),
  backgroundImage : new FormControl(),
  });

  constructor() {

  }

  ionViewDidLoad() {
    console.log('ionViewDidLoad DetailsPage');
  }

}
So now we have a reactive form. However, the way it is setup now is not the greatest. The above is great for single input forms but falls flat when you have multiple values. For instance, these are all separate form fields. We should link them together so that with a parent. To do that we need to wrap them in a form group. To do this we need to a form tag to the HTML and update the form control attributes to form control names. This look like the below
<br /><h2>Add Book</h2>
<p>Please add the following information to add a new book to the list.</p>
<form [formGroup]="addBookForm">
<ion-list>
    <ion-item>
        <ion-label floating>Book Name</ion-label>
        <ion-input class="form-control" formControlName="title"></ion-input>
    </ion-item>
    <ion-item>
        <ion-label floating>Book Description</ion-label>
        <ion-input class="form-control" formControlName="description"></ion-input>
    </ion-item>
    <ion-item>
      <ion-label floating>Cover Image</ion-label>
      <ion-input class="form-control" formControlName="backgroundImage"></ion-input>
    </ion-item>
</ion-list>
</form>
import { Component, Input } from '@angular/core';
import { IonicPage, NavController, NavParams } from 'ionic-angular';
import { Book, fakeBookList } from '../shared/book.model';
import { FormControl, FormGroup } from '@angular/forms';

@Component({
  selector: 'add-book',
  templateUrl: 'add-book.html'
})
export class AddBookComponent {
  addBookForm = new FormGroup ({
    title : new FormControl(),
    description : new FormControl(),
    backgroundImage : new FormControl(),
  });

  constructor() {

  }

  ionViewDidLoad() {
    console.log('ionViewDidLoad DetailsPage');
  }

}
All of the above code will work but as your forms get more complicated all of this setup starts to become monstrous. This is where the Form Builder comes in and is honestly what I like to use regardless of what my form is like. We won’t need to update our template this time but our class is now a bit different.
Our form isn’t too useful right now, mostly because it doesn’t do anything now but it also doesn’t validate any of the inputs. Adding these validators is super easy though. Just import the Validators module and update the form group to add the validators. So we can test that form is working, let’s add a submit button.
Lastly, let’s “save” our new book by filling everything out! Update the add-book.ts file with a save book method and have it print out a message when the save is valid. Update the html to add a submit method
<h2>Add Book</h2>
<p>Please add the following information to add a new book to the list.</p>
<form [formGroup]="addBookForm" (submit)="saveUser()">
<ion-list>
    <ion-item>
        <ion-label floating>Book Name</ion-label>
        <ion-input class="form-control" formControlName="title" required></ion-input>
    </ion-item>
    <ion-item>
        <ion-label floating>Book Description</ion-label>
        <ion-input class="form-control" formControlName="description" required></ion-input>
    </ion-item>
    <ion-item>
      <ion-label floating>Cover Image</ion-label>
      <ion-input class="form-control" formControlName="backgroundImage" required></ion-input>
    </ion-item>
    <ion-item>
        <button ion-button type="submit" [disabled]="!addBookForm.valid">Submit</button>
    </ion-item>
</ion-list>
</form>
Finally check that the form is dirty and is valid and print out that the save happened.
That’s it! That is how you work with Forms in Ionic. Obviously there are more to them but this will get you started creating your first Ionic App. My next tutorial will be going over saving data and actually using some Cordova plugins. We’ll actually hook up our add book form to a “database” and start adding new books to our list. Hope to see you then!
Welcome to my tutorial on learning the Ionic Framework. During the course of this lab, you’ll hopefully learn a basic understanding of the Ionic Framework and also learn a bit if Angular 5. If you’re already familiar with either one, this lab will probably not be for you.
Lab three will walk through events and how to handle them in a stateful and stateless manor.Ionic Framework. It took me a while to fully grasp these concepts to I hope to share with you what I learned. If you missed Lab two check out Learning the Ionic Framework – Components.
Welcome to my tutorial on learning the Ionic Framework. During the course of this lab, you’ll hopefully learn a basic understanding of the Ionic Framework and also learn a bit if Angular 5. If you’re already familiar with either one, this lab will probably not be for you.
Lab two will walk through the creation of components and how they work in the Ionic Framework. I hope to show you why a component based architecture is powerful and help keep your code maintainable. If you missed Lab One check out Learning the Ionic Framework – Pages
We do need a place to put our new component Books. The second command above created a new page. However, nothing has been hooked up to get to it. Let’s change home page’s navigation so that we can navigate to our new page!
Update the click even on the button clicks to pass in the ionic page’s name.
This won’t work as it is right now so we need to update the home.ts to allow the use the string names. You can also use the exported class type (LabOnePage) to do this type of Navigation.
import { Component } from '@angular/core';
import { NavController, IonicPage } from 'ionic-angular';
import { LabOnePage } from '../lab-one/lab-one';
import { LabTwoPage } from '../lab-two/lab-two';

@Component({
  selector: 'page-home',
  templateUrl: 'home.html'
})
export class HomePage {

  constructor(public navCtrl: NavController) {

  }

  navigateTo(page: any){
    this.navCtrl.push(page);
  }
}
Next, we have to update the app.module.ts file to remove the LabOnePage references or they will cause errors.
import { BrowserModule } from '@angular/platform-browser';
import { ErrorHandler, NgModule } from '@angular/core';
import { IonicApp, IonicErrorHandler, IonicModule } from 'ionic-angular';
import { SplashScreen } from '@ionic-native/splash-screen';
import { StatusBar } from '@ionic-native/status-bar';

import { MyApp } from './app.component';
import { HomePage } from '../pages/home/home';
import { LabOnePage } from '../pages/lab-one/lab-one';

@NgModule({
  declarations: [
    MyApp,
    HomePage
  ],
  imports: [
    BrowserModule,
    IonicModule.forRoot(MyApp)
  ],
  bootstrap: [IonicApp],
  entryComponents: [
    MyApp,
    HomePage
  ],
  providers: [
    StatusBar,
    SplashScreen,
    {provide: ErrorHandler, useClass: IonicErrorHandler}
  ]
})
export class AppModule {}
Finally, update the lab-two.html file to sort of match the lab-one page and its corresponding scss file.
<!--
  Generated template for the LabOnePage page.

  See http://ionicframework.com/docs/components/#navigation for more info on
  Ionic pages and navigation.
-->
<ion-header>

  <ion-navbar>
    <ion-title>LabTwo</ion-title>
  </ion-navbar>

</ion-header>


<ion-content class="lab-two">
  <div class="lab-two__hero">
  </div>
  <ion-card padding>
    Lorem ipsum dolor sit amet, consectetur adipiscing elit. Ut condimentum placerat facilisis. Nam aliquam dolor rhoncus ex ullamcorper aliquam. Cras commodo enim vitae eleifend facilisis. Vivamus hendrerit magna ut tellus tincidunt, porttitor tristique est venenatis. Ut nec nibh in nibh efficitur aliquet vitae ut odio. Quisque pretium quis elit ut laoreet. Quisque posuere ante sit amet lorem vestibulum aliquam. Proin auctor, dolor non cursus vulputate, velit mauris finibus justo, et facilisis arcu quam quis sapien. Donec interdum, dui non bibendum ornare, risus augue dignissim ex, nec vulputate tellus eros et diam. Donec sed consequat nunc, sed vestibulum diam. Phasellus leo risus, ornare eu sodales non, blandit et massa. Phasellus lorem enim, aliquet vitae vestibulum ac, lacinia et erat. Fusce vel lacus id nisi gravida rhoncus quis nec velit. Aenean condimentum nisl sed odio malesuada sodales. Etiam rutrum consequat augue. Integer sit amet leo elementum, fermentum tortor eu, sodales lorem.
  </ion-card>
</ion-content>
Components are the bread and butter of most modern JavaScript frameworks. The issue with many project, not just front-end ones is that classes tend to get bigger and bigger over time. Components try to fix this by modularizing the code into small reusable components. This also has the tendency to make things far more testable; which is a great thing!
Let’s begin by creating a component!
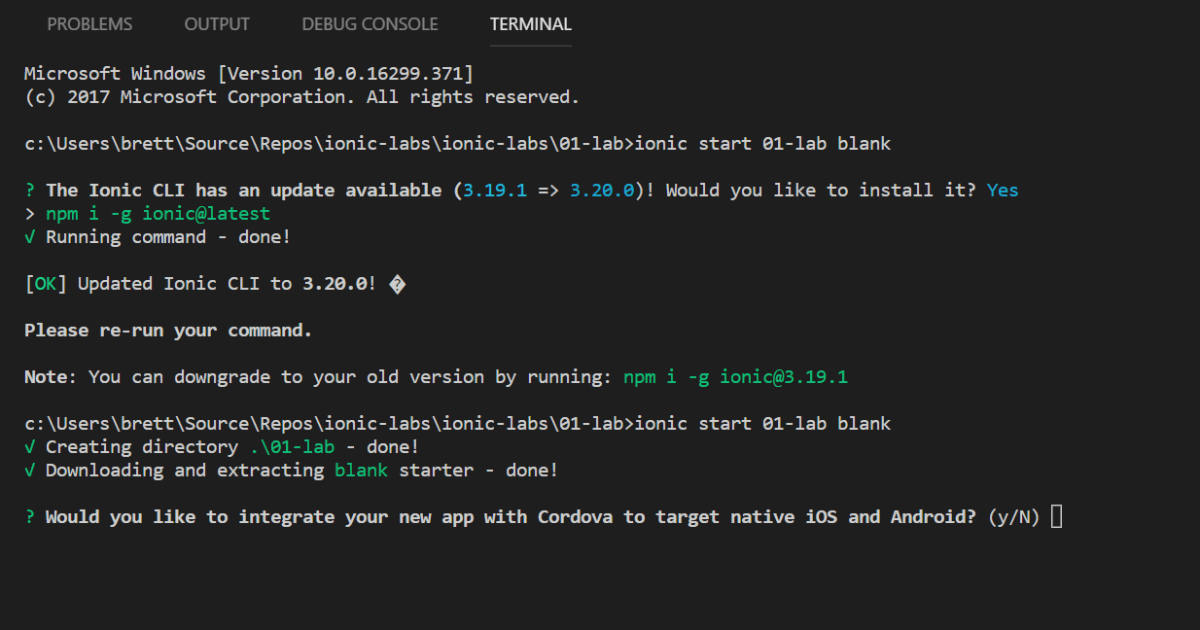
In the console type ionic generate component books. This will create a new component automatically and will use best practices as best as it is able. Let’s run our code and see what happens
ionic serve
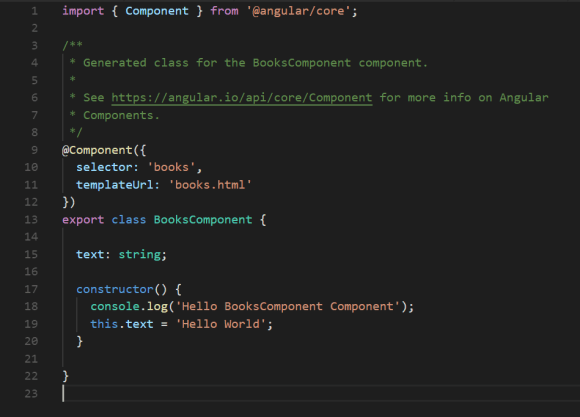
Since we’re on Lab 2, let’s click on it and see what happens! If we open it up, we don’t see our component books. That’s because we haven’t added it yet! To do so we need to add it to our Lab 2 page component. In the image below, you’ll see the selector line “books”. The selector is how you add it the component wherever you need it. When we add the selector to our lab 2 page, it will include it.
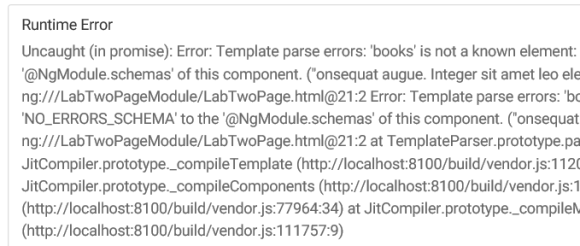
Oops! We forgot something
What this is telling us is that the page doesn’t know anything about the component. That’s because angular uses something called modules. You can think of these like namespaces. We won’t be going into these but below is how you can fix the error.
import { NgModule } from '@angular/core';
import { IonicPageModule } from 'ionic-angular';
import { LabTwoPage } from './lab-two';
import { ComponentsModule } from '../../components/components.module';

@NgModule({
  declarations: [
    LabTwoPage,
  ],
  imports: [
    IonicPageModule.forChild(LabTwoPage),
    ComponentsModule
  ],
})
export class LabTwoPageModule {}
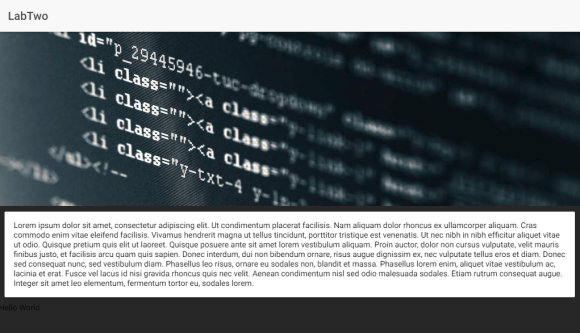
If you look close, you’ll see Hello World at the bottom.
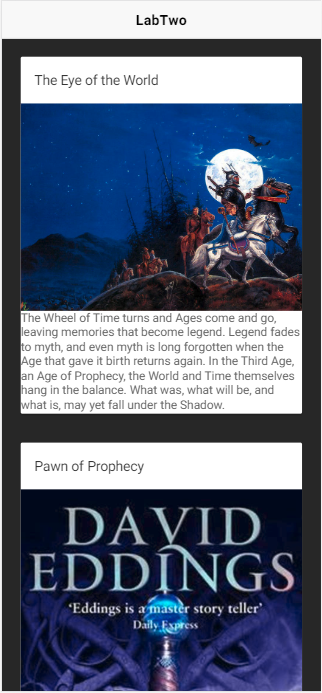
The component isn’t very useful at the moment so let’s make it look nice. I recommend you use your own images below. Let’s add some of my favorite books to this list.
<div class="books">


 <h2 class="card-title">The Eye of the World</h2>

<div class="card__image"></div>

<p class="card-subtitle">The Wheel of Time turns and Ages come and go, leaving memories that become legend. Legend fades to myth, and even myth is long forgotten when the Age that gave it birth returns again. In the Third Age, an Age of Prophecy, the World and Time themselves hang in the balance. What was, what will be, and what is, may yet fall under the Shadow.</p>
</ion-card>
</ion-col>
<ion-col>
 <ion-card>
<ion-card-header>
 <h2 class="card-title">Pawn of Prophecy</h2>
</ion-card-header>
<div class="card__image"></div>

<p class="card-subtitle">Long ago, the Storyteller claimed, in this first book of THE BELGARIAD, the evil god Torak drove men and Gods to war. But Belgarath the Sorcerer led men to reclaim the Orb that protected men of the West. So long as it lay at Riva, the prophecy went, men would be safe.
But Garion did not believe in such stories. Brought up on a quiet farm by his Aunt Pol, how could he know that the Apostate planned to wake dread Torak, or that he would be led on a quest of unparalleled magic and danger by those he loved--but did not know...?</p>
</ion-card>
</ion-col>
</ion-row>
<ion-row>
<ion-col>
<ion-card>
<ion-card-header>
   <h2 class="card-title">Sword of Shannara</h2>
</ion-card-header>
 <div class="card__image"></div>

<p class="card-subtitle">Living in peaceful Shady Vale, Shea Ohmsford knew little of the troubles that plagued the rest of the world. Then the giant, forbidding Allanon revaled that the supposedly dead Warlock Lord was plotting to destory the world. The sole weapon against this Power of Darkness was the Sword of Shannara, which could only be used by a true heir of Shannara--Shea being the last of the bloodline, upon whom all hope rested. Soon a Skull Bearer, dread minion of Evil, flew into the Vale, seeking to destroy Shea. To save the Vale, Shea fled, drawing the Skull Bearer after him....</p>
</ion-card>
</ion-col>
<ion-col>
<ion-card>
<ion-card-header>
   <h2 class="card-title">Wizards First Rule</h2>
</ion-card-header>
 <div class="card__image"></div>

<p class="card-subtitle">After the brutal murder of his father, a mysterious woman, Kahlan Amnell, appears in Richard Cypher's forest sanctuary seeking help...and more. His world and beliefs are shattered when ancient debts come due with thundering violence.

 In a dark age it takes courage to live, and more than courage to challenge those who hold dominion. Richard and Kahlan must take up that challenge or become the next victims. Yet, Richard fears nothing so much as what secrets his sword might reveal about his own soul. Falling in love would destroy them_for reasons Richard can't imagine and Kahlan dare not say.

 In their darkest hour, Kahlan calls upon Richard to reach beyond his sword to invoke within himself something nobler. Neither knows that the rules of battle have just changed...or that their time has run out.</p>
</ion-card>
</ion-col>
</ion-row>
</ion-grid>


</div>
But unfortunately we missed something. For some reason it isn’t finding our any of the ionic framework components found on https://ionicframework.com/docs/components. To fix it we need to add the IonicModule to our components module (namespace). This gives us access to all Ionic components. The fact they did not add it automatically is quite frustrating and one small failing I have found
The following code will fix it however.
import { NgModule } from '@angular/core';
import { BooksComponent } from './books/books';
import { IonicModule } from 'ionic-angular';
@NgModule({
    declarations: [BooksComponent],
    imports: [IonicModule],
    exports: [BooksComponent]
})
export class ComponentsModule {}
Once you fix this, you should be able to navigate to Lab 2 and see something like the following.
Too Simple?
You’re right it is. The above example isn’t a great presentation of what you would really do in the real world. The above is just hard coded static web pages. In the following examples, we’ll go over passing data into component so it can be used.
Keep Components Stateless
A key tenant of component architecture is stateful and stateless components. Top level component (i.e. Pages) should manage all of the state of that page and its subcomponents. Subcomponents shouldn’t care about the overall state of things they should just care about how to show/change that state and trigger events if something interesting happens.
Make Books Data Driven
To make Books data driven, we need to create a model and seed it with some data. We’ll do that here. I’ve created this already in and can be found below. The class is just a model of data we want to show in our view. The const fakeBookList is just a faked array of the data we previously had in our static HTML. (book.model.ts)
export class Book {
  title: string;
  description: string;
  backgroundImage:string;
}

export const fakeBookList: Array = [
  {
    title: 'The Eye of the World',
    description: 'The Wheel of Time turns and Ages come and go, leaving memories that become legend. Legend fades to myth, and even myth is long forgotten when the Age that gave it birth returns again. In the Third Age, an Age of Prophecy, the World and Time themselves hang in the balance. What was, what will be, and what is, may yet fall under the Shadow.',
    backgroundImage: 'assets/imgs/world.jpg'
  },
  {
    title: 'Pawn of Prophecy',
    description: 'Long ago, the Storyteller claimed, in this first book of THE BELGARIAD, the evil god Torak drove men and Gods to war. But Belgarath the Sorcerer led men to reclaim the Orb that protected men of the West. So long as it lay at Riva, the prophecy went, men would be safe.  But Garion did not believe in such stories. Brought up on a quiet farm by his Aunt Pol, how could he know that the Apostate planned to wake dread Torak, or that he would be led on a quest of unparalleled magic and danger by those he loved--but did not know...?',
    backgroundImage: 'assets/imgs/pawn.jpg'
  },
  {
    title: 'Sword of Shannara',
    description: 'Living in peaceful Shady Vale, Shea Ohmsford knew little of the troubles that plagued the rest of the world. Then the giant, forbidding Allanon revaled that the supposedly dead Warlock Lord was plotting to destory the world. The sole weapon against this Power of Darkness was the Sword of Shannara, which could only be used by a true heir of Shannara--Shea being the last of the bloodline, upon whom all hope rested. Soon a Skull Bearer, dread minion of Evil, flew into the Vale, seeking to destroy Shea. To save the Vale, Shea fled, drawing the Skull Bearer after him....',
    backgroundImage: 'assets/imgs/sword.jpg'
  },
  {
    title: 'Wizards First Rule',
    description: 'After the brutal murder of his father, a mysterious woman, Kahlan Amnell, appears in Richard Cypher's forest sanctuary seeking help...and more. His world and beliefs are shattered when ancient debts come due with thundering violence.
    In a dark age it takes courage to live, and more than courage to challenge those who hold dominion. Richard and Kahlan must take up that challenge or become the next victims. Yet, Richard fears nothing so much as what secrets his sword might reveal about his own soul. Falling in love would destroy them_for reasons Richard can't imagine and Kahlan dare not say.
    In their darkest hour, Kahlan calls upon Richard to reach beyond his sword to invoke within himself something nobler. Neither knows that the rules of battle have just changed...or that their time has run out.',
    backgroundImage: 'assets/imgs/wizards-rule.jpg'
  }
]
State is on the Scene
To follow good design principles, we will make LabTwo page the state holder of this lab. In this simple example, I’ll use the faked data on the lab-two.ts file and make it a property on the page.
import { Component } from '@angular/core';
import { IonicPage, NavController, NavParams } from 'ionic-angular';
import { Book, fakeBookList } from '../../components/books/book.model';

/**
 * Generated class for the LabTwoPage page.
 *
 * See https://ionicframework.com/docs/components/#navigation for more info on
 * Ionic pages and navigation.
 */

@IonicPage({
  name: 'lab-two'
})
@Component({
  selector: 'page-lab-two',
  templateUrl: 'lab-two.html',
})
export class LabTwoPage {

  bookList:Array =  fakeBookList;

  constructor(public navCtrl: NavController, public navParams: NavParams) {
  }

  ionViewDidLoad() {
    console.log('ionViewDidLoad LabTwoPage');
  }

}
We’ll also have to pass this data into the books component. To do this we need to use the [ property.name ] syntax. This will tell the child component to take this data and put it in this child component property.
<!--
  Generated template for the LabOnePage page.

  See http://ionicframework.com/docs/components/#navigation for more info on
  Ionic pages and navigation.
-->
<ion-header>

  <ion-navbar>
    <ion-title>LabTwo</ion-title>
  </ion-navbar>

</ion-header>


<ion-content class="lab-two">
  <books [bookList]='bookList'></books>
</ion-content>
In this example the lab-two.ts is holding onto the data and maintaining its state.
Stateless Don’t Want None
The child component books now needs to be updated to accept the input the parent added. This can be done with the @Input() decorator.
import { Component, Input } from '@angular/core';
import { Book } from './book.model';

/**
 * Generated class for the BooksComponent component.
 *
 * See https://angular.io/api/core/Component for more info on Angular
 * Components.
 */
@Component({
  selector: 'books',
  templateUrl: 'books.html'
})
export class BooksComponent {

  @Input() bookList: Book[];

  constructor() {
    console.log('Hello BooksComponent Component');
  }

}
Finally just update the books.html to use the book model’s properties and get rid all the excess stuff from our static HTML.
That’s it! That is how you work with components in Ionic. Obviously there are more to them but this will get you started creating your first Ionic App. My next tutorial will be going over events and modifying state. Hope to see you then!
Welcome to my tutorial on learning the Ionic Framework. During the course of this lab, you’ll hopefully learn a basic understanding of the Ionic Framework and also learn a bit if Angular 5. If you’re already familiar with either one, this lab will probably not be for you.
Lab One will walk through the creation of a new project, project structure, and adding a new page!
Kelsey and Brett speak with Anna Heiermann about her Stir Trek talk “QA is slowing my project down! Let’s talk Risk Based Testing”. For more information check out her talk at Stir Trek.
On this episode of Coding Personalities, Brett and Kelsey are joined by Vince Paulson. They discuss how Vince got into software development, the Global Azure Bootcamp in Columbus and Swamp Guides!