
Welcome to my tutorial on learning the Ionic Framework. During the course of this lab, you’ll hopefully learn a basic understanding of the Ionic Framework and also learn a bit if Angular 5. If you’re already familiar with either one, this lab will probably not be for you.
Lab three will walk through events and how to handle them in a stateful and stateless manor.Ionic Framework. It took me a while to fully grasp these concepts to I hope to share with you what I learned. If you missed Lab two check out Learning the Ionic Framework – Components.
Getting Started
First things first. We need to get the lab three start repo, create our lab 3 pages and our component from lab two to our new page.
- Create a lab-three-start folder on your machine and open it with VS Code
- git clone – https://github.com/bwhittington/ionic-lab-three-start
- ionic generate page LabThree
- Copy html code from lab-two.html to lab-three.html
- Copy scss code from lab-two.scss to lab-three.scss and rename the class lab-two to lab-three.
- Add ComponentsModule located in lab-two.module.ts to the imports section of lab-three.module.ts. Fix your imports
- Add booklist property on lab-two.ts to lab-three.ts. Fix your imports
- Add click event to Lab Three in home.html.
- ionic serve
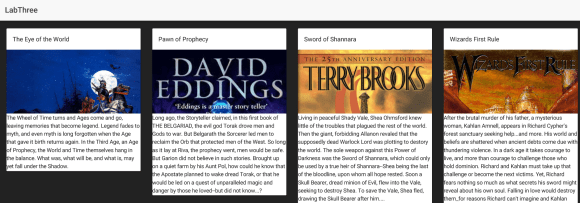
You should now see all of our books appear on lab 3 page. This goes to show you how components could be very reusable throughout an app.
Simple Events
There are likely many scenarios when what I call a simple event exists. Angular as opposed to AngularJS eliminated two way databinding and is now built for a unidirectional flow system. Last lab, we started working with parent-child relationships and this lab will expand on the possibilities with that system. In general, stateful components (in Ionic Pages) should pass data down to the child components that need it and child components should pass events causing state changes to the parent, for the parent to change them. To do this we need to use 2 new features we have yet to talk about.: @Output decorators and EventEmitters.
@Output Decorators
@Output tells Angular that this component expects to send data/control/events out of it. For this lab, when a user click on one our favorite books, I’d like the app to move to the page’s details page.
EventEmitters
@Output decorators are great but they don’t really work unless the component emits an event that can be sent out through the output. For this lab, when a user click’s on a book, it fires and event and then that event emits an event to the parent. Let’s do that now.
I want to start by updating our book model and the faked book list by adding id’s for them.
export class Book {
id: number;
title: string;
description: string;
backgroundImage:string;
}
export const fakeBookList: Array<Book> = [
{
id: 1,
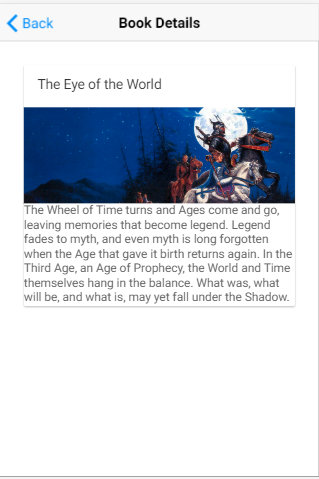
title: 'The Eye of the World',
description: 'The Wheel of Time turns and Ages come and go, leaving memories that become legend. Legend fades to myth, and even myth is long forgotten when the Age that gave it birth returns again. In the Third Age, an Age of Prophecy, the World and Time themselves hang in the balance. What was, what will be, and what is, may yet fall under the Shadow.',
backgroundImage: 'assets/imgs/world.jpg'
},
{
id: 2,
title: 'Pawn of Prophecy',
description: 'Long ago, the Storyteller claimed, in this first book of THE BELGARIAD, the evil god Torak drove men and Gods to war. But Belgarath the Sorcerer led men to reclaim the Orb that protected men of the West. So long as it lay at Riva, the prophecy went, men would be safe. But Garion did not believe in such stories. Brought up on a quiet farm by his Aunt Pol, how could he know that the Apostate planned to wake dread Torak, or that he would be led on a quest of unparalleled magic and danger by those he loved--but did not know...?',
backgroundImage: 'assets/imgs/pawn.jpg'
},
{
id: 3,
title: 'Sword of Shannara',
description: 'Living in peaceful Shady Vale, Shea Ohmsford knew little of the troubles that plagued the rest of the world. Then the giant, forbidding Allanon revaled that the supposedly dead Warlock Lord was plotting to destory the world. The sole weapon against this Power of Darkness was the Sword of Shannara, which could only be used by a true heir of Shannara--Shea being the last of the bloodline, upon whom all hope rested. Soon a Skull Bearer, dread minion of Evil, flew into the Vale, seeking to destroy Shea. To save the Vale, Shea fled, drawing the Skull Bearer after him....',
backgroundImage: 'assets/imgs/sword.jpg'
}
]
We also need to update our child component (books.ts) file with the new @Output Parameter and a new event emitter and a new method that will emit our event!
import { Component, Input, Output, EventEmitter } from '@angular/core';
import { Book } from './book.model';

/**
 * Generated class for the BooksComponent component.
 *
 * See https://angular.io/api/core/Component for more info on Angular
 * Components.
 */
@Component({
  selector: 'books',
  templateUrl: 'books.html'
})
export class BooksComponent {

  @Input() bookList: Book[];
  @Output()
  viewDetailsClick: EventEmitter<String>;

  constructor() {
    this.viewDetailsClick = new EventEmitter<String>();
  }

  viewDetails = function (id) {
    this.viewDetailsClick.emit(id);
  }

}
We need to update the book component to then use our new event when a book is clicked! What’s different about this click event is that we are also passing in an $event as well as the Id of the book we are clicking on. The $event parameter means we are passing in that event.
<div class="books">


                <h2 class="card-title">{{ book.title }}</h2>

              <div class="card__image"></div>

              <p class="card-subtitle">{{ book.description }}</p>
            </ion-card>
      </ion-col>
      </ion-row>
  </ion-grid>
</div>
Let’s Try it out!
Run ionic serve and click on Lab Three and click on a book!
What?!? It’s not working. If you debug your code, you’ll see that the event is emitting but we aren’t doing with it yet. Besides, we don’t have a book-details page yet.
Details Page
Since we need a details page, let’s make it pretty generic. To start type ionic generate pages detail. This will create our details page.
<!--
  Generated template for the DetailsPage page.

  See http://ionicframework.com/docs/components/#navigation for more info on
  Ionic pages and navigation.
-->
<ion-header>

  <ion-navbar>
    <ion-title>Book Details</ion-title>
  </ion-navbar>

</ion-header>


<ion-content padding>
    <ion-card>
        <ion-card-header>
            <h2 class="card-title">{{ book.title }}</h2>
        </ion-card-header>
          <div class="card__image"></div>
          <p class="card-subtitle">{{ book.description }}</p>
        </ion-card>
</ion-content>
We’ll also need to setup the details.ts file to load our individual book based off of the Id when the page is initialized.
import { Component } from '@angular/core';
import { IonicPage, NavController, NavParams } from 'ionic-angular';
import { Book, fakeBookList } from '../../components/books/book.model';

/**
 * Generated class for the DetailsPage page.
 *
 * See https://ionicframework.com/docs/components/#navigation for more info on
 * Ionic pages and navigation.
 */

@IonicPage(
  {
    name: 'details'
  }
)
@Component({
  selector: 'page-details',
  templateUrl: 'details.html',
})
export class DetailsPage {

  bookId: number = 0;
  book: Book;
  bookList:Array =  fakeBookList;

  constructor(public navCtrl: NavController, public navParams: NavParams) {
  }

  ngOnInit() {

    this.bookId = this.navParams.get('bookId');
    this.book = this.bookList.find( book => book.id == this.bookId);

  }

  ionViewDidLoad() {
    console.log('ionViewDidLoad DetailsPage');
  }

}
Finally, let’s give it an ugly style.
  .card__image {
    height:30vmin;
    background: url('/assets/imgs/code.jpg') center no-repeat;
    background-size:cover;
  }
Oops! I forgot to add the new page to our app.module.ts. Without this, the app doesn’t know about the details page.
import { BrowserModule } from '@angular/platform-browser';
import { ErrorHandler, NgModule } from '@angular/core';
import { IonicApp, IonicErrorHandler, IonicModule } from 'ionic-angular';
import { SplashScreen } from '@ionic-native/splash-screen';
import { StatusBar } from '@ionic-native/status-bar';

import { MyApp } from './app.component';
import { HomePage } from '../pages/home/home';
import { DetailsPageModule } from '../pages/details/details.module';

@NgModule({
  declarations: [
    MyApp,
    HomePage,
  ],
  imports: [
    BrowserModule,
    IonicModule.forRoot(MyApp),
    DetailsPageModule
  ],
  bootstrap: [IonicApp],
  entryComponents: [
    MyApp,
    HomePage
  ],
  providers: [
    StatusBar,
    SplashScreen,
    {provide: ErrorHandler, useClass: IonicErrorHandler}
  ]
})
export class AppModule {}
Let’s try clicking on our book details now! Unfortunately, we’re still not getting anywhere.
To finish this up, we need to add an event handler on our Lab Three page. Add the event emitter to the books element on Lab-three.html. This instructs our component to listen for our event.
<!--
  Generated template for the LabOnePage page.

  See http://ionicframework.com/docs/components/#navigation for more info on
  Ionic pages and navigation.
-->
<ion-header>

  <ion-navbar>
    <ion-title>LabThree</ion-title>
  </ion-navbar>

</ion-header>


<ion-content class="lab-two">
  <books [bookList]='bookList' (viewDetailsClick)='viewDetails($event, id)'></books>
</ion-content>
And in lab-three.ts add our event to navigate to the details page passing in our emitted book id!
import { Component } from '@angular/core';
import { IonicPage, NavController, NavParams } from 'ionic-angular';
import { Book, fakeBookList } from '../../components/books/book.model';
import { DetailsPage } from '../details/details';

/**
 * Generated class for the LabThreePage page.
 *
 * See https://ionicframework.com/docs/components/#navigation for more info on
 * Ionic pages and navigation.
 */

@IonicPage(
  {
    name: 'lab-three'
  }
)
@Component({
  selector: 'page-lab-three',
  templateUrl: 'lab-three.html',
})
export class LabThreePage {
  bookList:Array =  fakeBookList;

  constructor(public navCtrl: NavController, public navParams: NavParams) {
  }

  ionViewDidLoad() {
    console.log('ionViewDidLoad LabThreePage');
  }

  viewDetails = function(bookId) {
    this.navCtrl.push(DetailsPage,  {
      bookId: bookId
    });
  };
}
Let’s try click on our event details now!
Next Time
That’s it! That is how you work with simple events in Ionic. My next tutorial will be going over Ionic plugins and implement one. This will let us get into some more advanced features and expand your understanding of how Ionic and Angular works! Hope to see you then!
