Welcome to my tutorial on learning the Ionic Framework. During the course of this lab, you’ll hopefully learn a basic understanding of the Ionic Framework and also learn a bit if Angular 5. If you’re already familiar with either one, this lab will probably not be for you.
Lab One will walk through the creation of a new project, project structure, and adding a new page!
Things You Need
- VS Code – https://code.visualstudio.com/
- Recommend VS Code Extensions
- Cordova Tools
- EditorConfig for VS Code
- ESLint
- Git History
- TSLint
- vscode-icons
- Node.JS – https://nodejs.org/en/ – You can get by with the LTS
- Platform Requirements – We will be using the browser for most of these labs but if you want to test on your phone or tablets you’ll need to do the following.
- Android – https://cordova.apache.org/docs/en/7.x/guide/platforms/android/
- iOS – https://cordova.apache.org/docs/en/7.x/guide/platforms/ios/
- Install Ionic
- npm install -g ionic
- Set VS Code Terminal to use CMD instead of powershell.
Getting Started
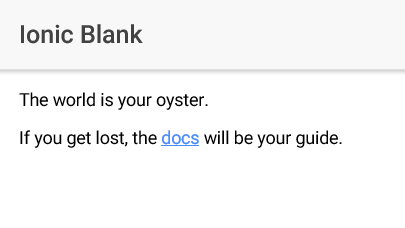
If you got the git repo then you might have noticed that the lab-one project is 100% empty. That is because we haven’t setup the project yet and I wanted to give you the experience to get started. Hence the title silly!
- Right click 01-lab and select open in command prompt.
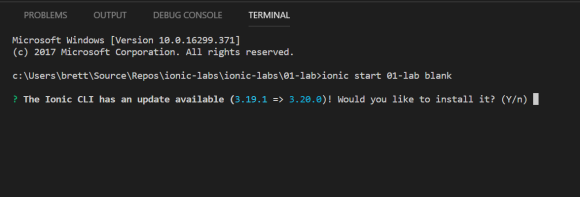
- Create Ionic Project
- ionic start 01-lab blank
- You may see the following prompt with some various version of the Ionic CLI. Select ‘Y’
- At this point, the Ionic CLI will update to the latest version and you’ll have to run the command again 😦 No worries, once you do that Ionic will get installed just fine.
- Next, you’ll see a prompt that asks you to integrate your app with Cordova. You should say ‘y’. It may take a bit to get everything downloaded.
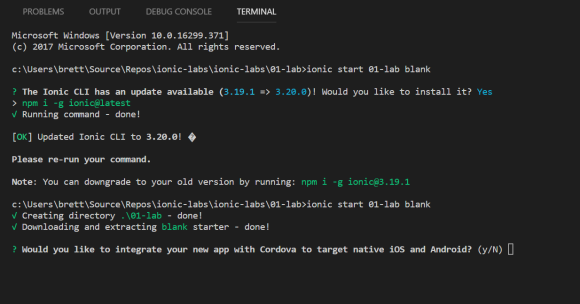
- The next prompt will ask you if you want to hook your app to the Ionic Pro SDK. Select ‘N’.
- I am not a Ionic employee nor a partner but I highly recommend it. It has helped me collaborate with my teams on projects and quickly create builds for devices with ease. If you decided to do this later, it super easy to do after the fact. More Information
Project Explanation

- src – this is a standard Angular folder where all of your application code is going to go. You shouldn’t need to touch too much outside of this.
- app – this folder contains the default root component called app. This is the component that kicks off the application and where all global/shared components, providers, and styles should go.
- assets – this folder will contain images and files that you want to be installed in the file system of application if you install it on a device.
- pages – this is slightly different than your typical Angular application. Ionic has its own routing system and does some special handling for page components.
- theme – this folder contains .scss files that has some global styles for ionic for easy overriding. You should not put any block level elements in here.
Run It!
At this point we should be able to run our blank application. To do so you can run the command following command:
- ionic serve
This command will kick build, transpile and process you’re code and serve it up in a local server using your default browser. This mode won’t get you too far. It is a great way to check out your templates and you’re styles. What you won’t be able to do is work with your cordova plugins using this method. Instead you can use the following:
- ionic cordova run browser
This command will actually run your project with plugins. However, many plugins will not work because they don’t have a proxy created for them. Most commonly, I’ve seen plugins like SQLite, FileOpener, File not work because we’re not running on a device. other plugins though do.
Generally, I try to do most of my UI work using ionic serve first and it is my recommendation you do the same!
Next Steps
Let’s setup the HomePage template so that we have a springboard for the rest of this lab and future labs.
<ion-header primary>
  <ion-navbar>
    <ion-title>
      Lab One
    </ion-title>
  </ion-navbar>
</ion-header>

<ion-content padding>
  <ion-card>
    <ion-card-header>
      Labs
    </ion-card-header>


    <ion-list>
      <button ion-item>
        <ion-icon name="pint" item-start></ion-icon>
        Lab One
      </button>

      <button ion-item primary>
        <ion-icon name="outlet" item-start></ion-icon>
        Lab Two
      </button>

      <button ion-item>
        <ion-icon name="nutrition" item-start></ion-icon>
        Lab Three
      </button>

      <button ion-item>
        <ion-icon name="nuclear" item-start></ion-icon>
        Lab Four
      </button>

      <button ion-item>
        <ion-icon name="beer" item-start></ion-icon>
        Lab Five
      </button>
    </ion-list>
  </ion-card>
</ion-content>
Nothing crazy going on here, we just deleted and added some new Ionic tags into our home.html for some “bootstrap” like controls.
Ionic Page Components
Pages in Ionic are a tad bit different than just a normal component in Angular. In an Angular sense, they are the same thing but the Ionic team gave us a few other things that set them apart.
@IonicPage
The @IonicPage decorator gives us a few advantages:
- Routing – you can setup a URL for a page and can access any page directly by referencing it’s name when using Ionic’s Navigation.
- Lazy-Loading – The pages module will be loaded by default when going to a page.
- App Module Reliance – You don’t have to reference Pages’ modules in your app.module because it is done at compilation.
Lifecycle Hooks
The lifecycle hooks are actually available to all components in Ionic but they make the most sense in the context of pages whereas Angular lifecycle hooks are more related to single components. Ionic’s page lifecycle works as follows:
- constructor()
- ionViewCanEnter()
- ionViewDidLoad()
- ionViewWillEnter()
- ionViewDidEnter()
- ionViewCanLeave()
- ionViewWillLeave()
- ionViewWillUnload()
We’ll some of these in greater detail in a later lab but I wanted to show them in the context of how Ionic is a bit different from Angular.
Adding a New Page
Whew! We had a lot to go over up until now. It’s finally time to add a new page to our app!
Let’s use the Ionic CLI to do this. If you’re app is still running, hit CTRL-C in the terminal to cancel it.
- Type ionic g page LabOne – this will create the folder structure for the new page.
- Run ionic serve
Now you might notice that your new page doesn’t show up and you have no way to click on it. We can do this easily by adding a click event to the Lab One Button on the home page.
<button ion-item (click)='navigateTo()'>
        <ion-icon name="pint" item-start></ion-icon>
        Lab One
      </button>
We also need to create this new event in our home.ts.
import { Component } from '@angular/core';
import { NavController } from 'ionic-angular';
import { LabOnePage } from '../lab-one/lab-one';

@Component({
  selector: 'page-home',
  templateUrl: 'home.html'
})
export class HomePage {

  constructor(public navCtrl: NavController) {

  }

  navigateTo(){
    this.navCtrl.push(LabOnePage)
  }
}
Voila! We finally have connected our pages! Run ionic serve now and try it out! You’ll probably get an error similar to mine.
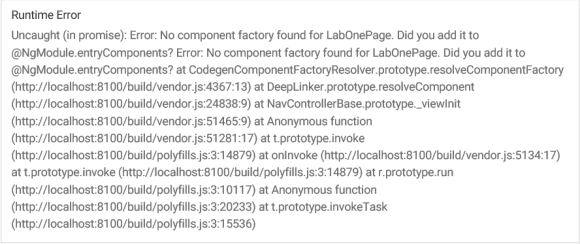
This is a very common error as the Ionic CLI isn’t updating the app.module with your new page. We’ll have to update your app to fix this.
- Open up your app.module.ts file and
- Add your LabOnePage to the declarations array
- Add your LabOnePage entryComponents array.
import { BrowserModule } from '@angular/platform-browser';
import { ErrorHandler, NgModule } from '@angular/core';
import { IonicApp, IonicErrorHandler, IonicModule } from 'ionic-angular';
import { SplashScreen } from '@ionic-native/splash-screen';
import { StatusBar } from '@ionic-native/status-bar';

import { MyApp } from './app.component';
import { HomePage } from '../pages/home/home';
import { LabOnePage } from '../pages/lab-one/lab-one';

@NgModule({
  declarations: [
    MyApp,
    HomePage,
    LabOnePage
  ],
  imports: [
    BrowserModule,
    IonicModule.forRoot(MyApp)
  ],
  bootstrap: [IonicApp],
  entryComponents: [
    MyApp,
    HomePage,
    LabOnePage
  ],
  providers: [
    StatusBar,
    SplashScreen,
    {provide: ErrorHandler, useClass: IonicErrorHandler}
  ]
})
export class AppModule {}
Updating Your New Page
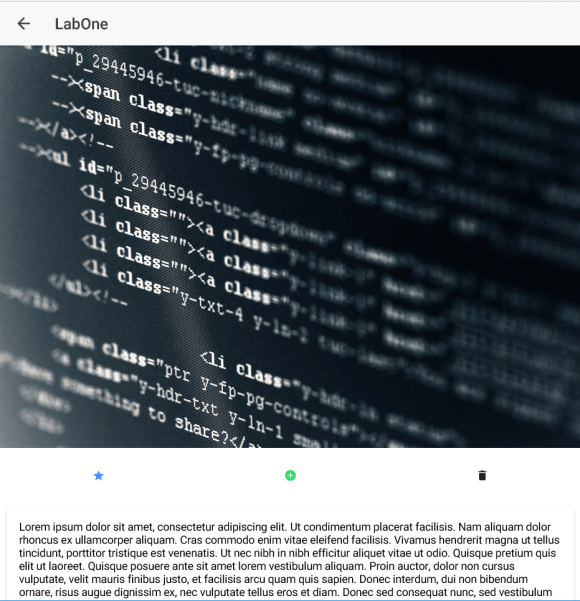
Let’s spruce up our page a bit and give you a very brief intro to some Ionic UI controls. For Lab One, we’ll add a hero image a few buttons and some generic text.
For a hero image, we’ll need to get a great image and add it to our page and project.
<!--
  Generated template for the LabOnePage page.

  See http://ionicframework.com/docs/components/#navigation for more info on
  Ionic pages and navigation.
-->
<ion-header>

  <ion-navbar>
    <ion-title>LabOne</ion-title>
  </ion-navbar>

</ion-header>


<ion-content padding>
  <img src='assets/imgs/code.jpg' />
</ion-content>
You’ll notice that I am using an image sourced from the assets folder. I could reference an online image some where and as long as the mobile device has data, it would go out to that source and grab that image. Ionic is just HTML/CSS/JavaScript so most HTTP requests will just work. If I want my app to be available offline though; images and files have to be available locally. That is what the assets folder is for which is why referenced it here.
I also added a grid so I can get some buttons to show up in a row.
<!--
  Generated template for the LabOnePage page.

  See http://ionicframework.com/docs/components/#navigation for more info on
  Ionic pages and navigation.
-->
<ion-header>

  <ion-navbar>
    <ion-title>LabOne</ion-title>
  </ion-navbar>

</ion-header>


<ion-content padding>
  <img src='assets/imgs/code.jpg' />
  <ion-grid>
      <ion-row>
        <ion-col col-4><button ion-button><ion-icon name="star"></ion-icon></button></ion-col>
        <ion-col col-4><button ion-button><ion-icon name="add-circle"></ion-icon></button></ion-col>
        <ion-col col-4><button ion-button><ion-icon name="trash"></ion-icon></button></ion-col>
      </ion-row>
    </ion-grid>
    <ion-card>
        Lorem ipsum dolor sit amet, consectetur adipiscing elit. Ut condimentum placerat facilisis. Nam aliquam dolor rhoncus ex ullamcorper aliquam. Cras commodo enim vitae eleifend facilisis. Vivamus hendrerit magna ut tellus tincidunt, porttitor tristique est venenatis. Ut nec nibh in nibh efficitur aliquet vitae ut odio. Quisque pretium quis elit ut laoreet. Quisque posuere ante sit amet lorem vestibulum aliquam. Proin auctor, dolor non cursus vulputate, velit mauris finibus justo, et facilisis arcu quam quis sapien. Donec interdum, dui non bibendum ornare, risus augue dignissim ex, nec vulputate tellus eros et diam. Donec sed consequat nunc, sed vestibulum diam. Phasellus leo risus, ornare eu sodales non, blandit et massa. Phasellus lorem enim, aliquet vitae vestibulum ac, lacinia et erat. Fusce vel lacus id nisi gravida rhoncus quis nec velit. Aenean condimentum nisl sed odio malesuada sodales. Etiam rutrum consequat augue. Integer sit amet leo elementum, fermentum tortor eu, sodales lorem.
    </ion-card>
</ion-content>
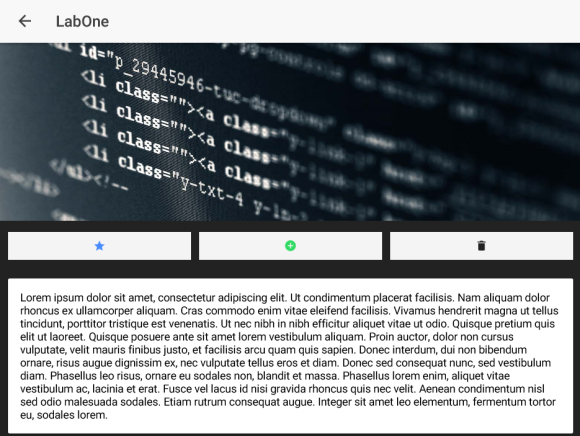
Damn! Even for a demo that is pretty ugly. Let’s liven it up a bit. When we used the Ionic CLI to generate our page, you might have noticed we also received an .scss file. Ionic by default uses SASS and we should be trying to scope our styles based on our components/pages. I do my best to follow BEM when name and styling my UI but first we can apply some Ionic provide attributes to accomplish some of this. So do the following to improve this page’s design.
- Removing padding from the ion-content element. This will allow our content to push out to the sides of the page.
- Add color=”secondary” to the second button.
- Add color=”dark” to the third button.
- Add full attribute to all the buttons. This makes our buttons span their entire parent.
- Add the clear attribute to all the buttons. This reverse the background color with the text color.
- Add the padding attribute to the ion-card element. This adds padding just to the card.
The Results!
<!--
  Generated template for the LabOnePage page.

  See http://ionicframework.com/docs/components/#navigation for more info on
  Ionic pages and navigation.
-->
<ion-header>

  <ion-navbar>
    <ion-title>LabOne</ion-title>
  </ion-navbar>

</ion-header>


<ion-content class="lab-one">
  <img src='assets/imgs/code.jpg' />
  <ion-grid>
      <ion-row>
        <ion-col col-4><button ion-button full clear><ion-icon name="star"></ion-icon></button></ion-col>
        <ion-col col-4><button ion-button color="secondary" full clear><ion-icon name="add-circle"></ion-icon></button></ion-col>
        <ion-col col-4><button ion-button color="dark" full clear><ion-icon name="trash"></ion-icon></button></ion-col>
      </ion-row>
    </ion-grid>
    <ion-card padding>
        Lorem ipsum dolor sit amet, consectetur adipiscing elit. Ut condimentum placerat facilisis. Nam aliquam dolor rhoncus ex ullamcorper aliquam. Cras commodo enim vitae eleifend facilisis. Vivamus hendrerit magna ut tellus tincidunt, porttitor tristique est venenatis. Ut nec nibh in nibh efficitur aliquet vitae ut odio. Quisque pretium quis elit ut laoreet. Quisque posuere ante sit amet lorem vestibulum aliquam. Proin auctor, dolor non cursus vulputate, velit mauris finibus justo, et facilisis arcu quam quis sapien. Donec interdum, dui non bibendum ornare, risus augue dignissim ex, nec vulputate tellus eros et diam. Donec sed consequat nunc, sed vestibulum diam. Phasellus leo risus, ornare eu sodales non, blandit et massa. Phasellus lorem enim, aliquet vitae vestibulum ac, lacinia et erat. Fusce vel lacus id nisi gravida rhoncus quis nec velit. Aenean condimentum nisl sed odio malesuada sodales. Etiam rutrum consequat augue. Integer sit amet leo elementum, fermentum tortor eu, sodales lorem.
    </ion-card>
</ion-content>
So we’ve made all the changes we can using just Ionic theming attributes. Now it’s time to use some style to clean things up even more.
- Open up lab-one.html and add the following classes.
- To ion-content: lab-one
- Replace img tag with a div: lab-one__hero
- To each button: class=”lab-one__button”
- Open up the lab-one.scss and delete everything in it.
- Add the following code to lab-one.scss
.lab-one {
  background-color:color($colors, dark);
  &__hero {
    height:30vmin;
    background: url('/assets/imgs/code.jpg') center no-repeat;
    background-size:cover;
  }
  &__button {
    background-color:color($colors, light);
  }

}
The final html result
<!--
  Generated template for the LabOnePage page.

  See http://ionicframework.com/docs/components/#navigation for more info on
  Ionic pages and navigation.
-->
<ion-header>

  <ion-navbar>
    <ion-title>LabOne</ion-title>
  </ion-navbar>

</ion-header>


<ion-content class="lab-one">
  <div class="lab-one__hero">
  </div>
  <ion-grid>
      <ion-row>
        <ion-col col-4><button ion-button full clear class="lab-one__button"><ion-icon name="star"></ion-icon></button></ion-col>
        <ion-col col-4><button ion-button color="secondary" full clear class="lab-one__button"><ion-icon name="add-circle"></ion-icon></button></ion-col>
        <ion-col col-4><button ion-button color="dark" full clear class="lab-one__button"><ion-icon name="trash"></ion-icon></button></ion-col>
      </ion-row>
    </ion-grid>
    <ion-card padding>
        Lorem ipsum dolor sit amet, consectetur adipiscing elit. Ut condimentum placerat facilisis. Nam aliquam dolor rhoncus ex ullamcorper aliquam. Cras commodo enim vitae eleifend facilisis. Vivamus hendrerit magna ut tellus tincidunt, porttitor tristique est venenatis. Ut nec nibh in nibh efficitur aliquet vitae ut odio. Quisque pretium quis elit ut laoreet. Quisque posuere ante sit amet lorem vestibulum aliquam. Proin auctor, dolor non cursus vulputate, velit mauris finibus justo, et facilisis arcu quam quis sapien. Donec interdum, dui non bibendum ornare, risus augue dignissim ex, nec vulputate tellus eros et diam. Donec sed consequat nunc, sed vestibulum diam. Phasellus leo risus, ornare eu sodales non, blandit et massa. Phasellus lorem enim, aliquet vitae vestibulum ac, lacinia et erat. Fusce vel lacus id nisi gravida rhoncus quis nec velit. Aenean condimentum nisl sed odio malesuada sodales. Etiam rutrum consequat augue. Integer sit amet leo elementum, fermentum tortor eu, sodales lorem.
    </ion-card>
</ion-content>
Interesting Tip
At some point you might have been annoyed about having to constantly navigate to the Lab One page every time you saved the code to see your changes. To solve this problem while doing development you can open up your app.component and change your rootPage to your LabOne page. This will kick off the app on Lab Page One!
Next Time
That’s it! That is how you work with pages in Ionic. Obviously there are more to them but this will get you started creating your first Ionic App. My next tutorial will be going over components and how the work with pages and other components! Hope to see you then!

One reply on “Learning the Ionic Framework – Pages”
[…] Lab two will walk through the creation of components and how they work in the Ionic Framework. I hope to show you why a component based architecture is powerful and help keep your code maintainable. If you missed Lab One check out Learning the Ionic Framework – Pages […]
LikeLike