
This Guide
This guide is my ultimate guide to setting up Sitefinity. I’ll be updating it as I find new things that I commonly do when I want to setup a new project. Today, I’ll be going over common Visual Studio solution changes, Sitefinity Settings and more that I use on almost every project.
Initial Setup
Creating the Project
I highly recommend using the Sitefinity Project Manager (an exe) to setup the initial project. It does a great job of getting a clean project. Instructions on how to use the project manager can be found in Sitefinity’s Documentation.
Running the Blank Slate
Next follow the documentation on running the empty project and getting it running on your local machine. Once you get to the Sitefinity backend dashboard, your all set to start creating your website.
BUT….
While it is possible to get started on your website at this point, it is my opinion that the setup is not officially done. There are a lot of quality of life things that can be implemented outside of the CMS that will save you a lot of time.
Project Improvements
- Save your Sitefinity solution.
- Show all files
- Include the following files and folders to the project
- Project Root\App_Data\Sitefinity\Configuration
- Project Root\App_Data\Sitefinity\Sitefinity.lic
- Project Root\App_Data\Sitefinity\Storage
- Project Root\ResourcePackages
- Delete the following files and folders from the project
- Project Root\Backup
- Project Root\UpgradeLog.htm
- Include the following files and folders to the project
- Setup solution to use Sitefinity Nuget Packages
- Setup Sitefinity Nuget using documentation
- I also found this blog post by Pantaley Stoyanov to be helpful for setting this up properly, especially if I ran into some issues.
- Run the following command in Package Manager Console:
- Update-Package Telerik.Sitefinity.All -Version X.X.XXXX.X -Source http://nuget.sitefinity.com/nuget
- Setup Sitefinity Nuget using documentation
- Add NuGet.config file to project root – This will be used by VSTS for building our solution using Sitefinity’s NuGet server.
<?xml version="1.0" encoding="utf-8"?>
<configuration>
 <packageSources>
 <add key="SitefinityNuGet" value="http://nuget.sitefinity.com/nuget" />
 <add key="nuget.org" value="https://api.nuget.org/v3/index.json" />
 </packageSources>
 <activePackageSource>
 <add key="All" value="(Aggregate source)" />
 </activePackageSource>
</configuration>
Continuous Integration with VSTS
I use VSTS for it’s default source control and continuous integration. There are others out there but this one is mine. I have found that VSTS can do everything I’d like it to when it comes to source control and deploying Sitefinity sites to their home. Here are the steps I follow to set this up?
Setting Up Your Deployment Group
- Open your VSTS Project and click on Deployment Groups. This will help up the target server that will be hosting the site.
- Add a new deployment group and give it a name.
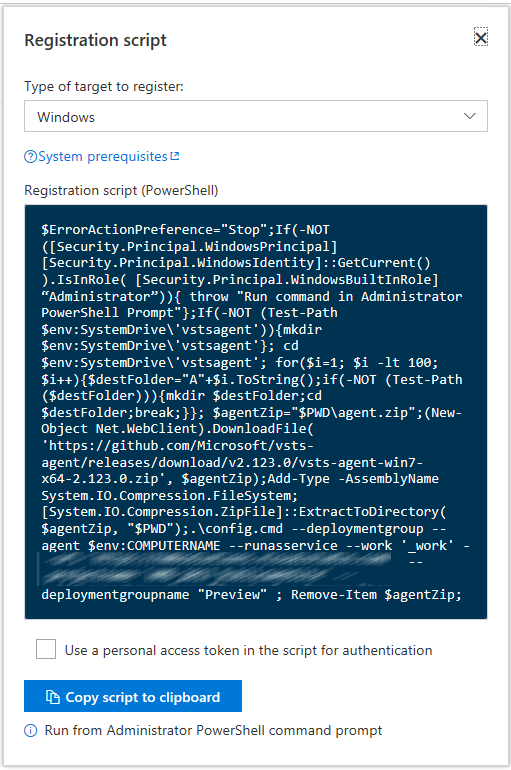
- Once that is completed, you are given a powershell registration script to run on the host server. *I highly recommend using the script, the other options tend to take way longer to setup*
Setting Up Build Configuration
- Click on the Builds tab and Create a new Build
- Select the ASP.NET (Preview) template
- On the Process Screen give your process a name
- Pick your Agent Queue
- I like to use the hosted VS2017 agent but its possible to install your own agents on your On Premises build services.
- Choose the solution that you wish to build from Source Control.
- The template should come with a Get Sources, NuGet Restor, and Build Solution step. You’ll need to create a Publish Artifact step as well.
- Get Sources
- Pick where the code is coming from. In this case from VSTS
- Pick the repository from VSTS to use
- Select your branch
- NuGet Restore
- Set your Display Name
- You command should be restore
- Feeds to use – Pick Feeds in my NuGet.config
- Your path can be empty if the NuGet.config exists in your project root.
- In Build solution you should be able to use the default settings.
- Publish Artifact
- Create your display name
- Set Path to Publish as $(Build.ArtifactStagingDirectory)
- Set Artifact name to Drop
- Set Artifact type to server
Your Done!
Setting up Releases
- Create a new release definition
- My server is a VM on a cloud machine so the template I am choosing is IIS Website and SQL database Deploy
- Click on Add Artifact
- Pick you Source – which is the build definition you want to keep
- Open the Environment Area
- Delete the SQL Deployment for now. You might want to deploy your database later
- Click on Manage IISWebsite
- Create your display name
- Your configuration type should be IIS Website
- Create or Update
- Enter the website name that you want it to show in IIS
- Select the physical path of where you want the website file deployed.
- Its possible to setup the bindings from here but I chose to setup the IIS bindings on the server myself.
- Click on Deploy IIS Website/App
- Enter the display name
- Enter the website name
- Make sure your package or folder is $(System.DefaultWorkingDirectory)\**\*.zip
- Your Done
Conclusion
A lot of the is the default options but once I tinkered with the above settings I was able to get this up in running in just a couple of hours. I had zero experience with this before hand. In part two, I will be describing listing out all of the Sitefinity settings that I feel should be automatically included and the way to set them up without running the solution.
